Unlock Bakery-Quality Bread: The Magic of No-Knead Dutch Oven Baking
Imagine the irresistible aroma of freshly baked bread filling your home. Picture a loaf with a perfectly golden, crispy crust and a tender, airy interior, boasting those delightful little air pockets that make each bite so satisfying. What if we told you that achieving this bakery-quality masterpiece doesn't require hours of kneading, special equipment, or an overnight wait? Enter the world of easy no knead Dutch oven bread – a culinary game-changer that empowers even novice bakers to create artisan-level loaves with minimal effort.
This remarkable method, championed by home cooks for its simplicity and stunning results, leverages the power of time and a humble cast iron pot. Forget the sticky mess of traditional kneading and the complex steps often associated with gourmet bread. With just a handful of basic ingredients and about 10 minutes of hands-on prep, you can enjoy a glorious, crusty loaf the very same day you decide to bake. It's an accessible path to homemade bread that truly tastes like it came from a professional European bakery, without ever leaving your kitchen.
The Secret to Bakery-Quality Loaves: Why Your Dutch Oven is a Game-Changer
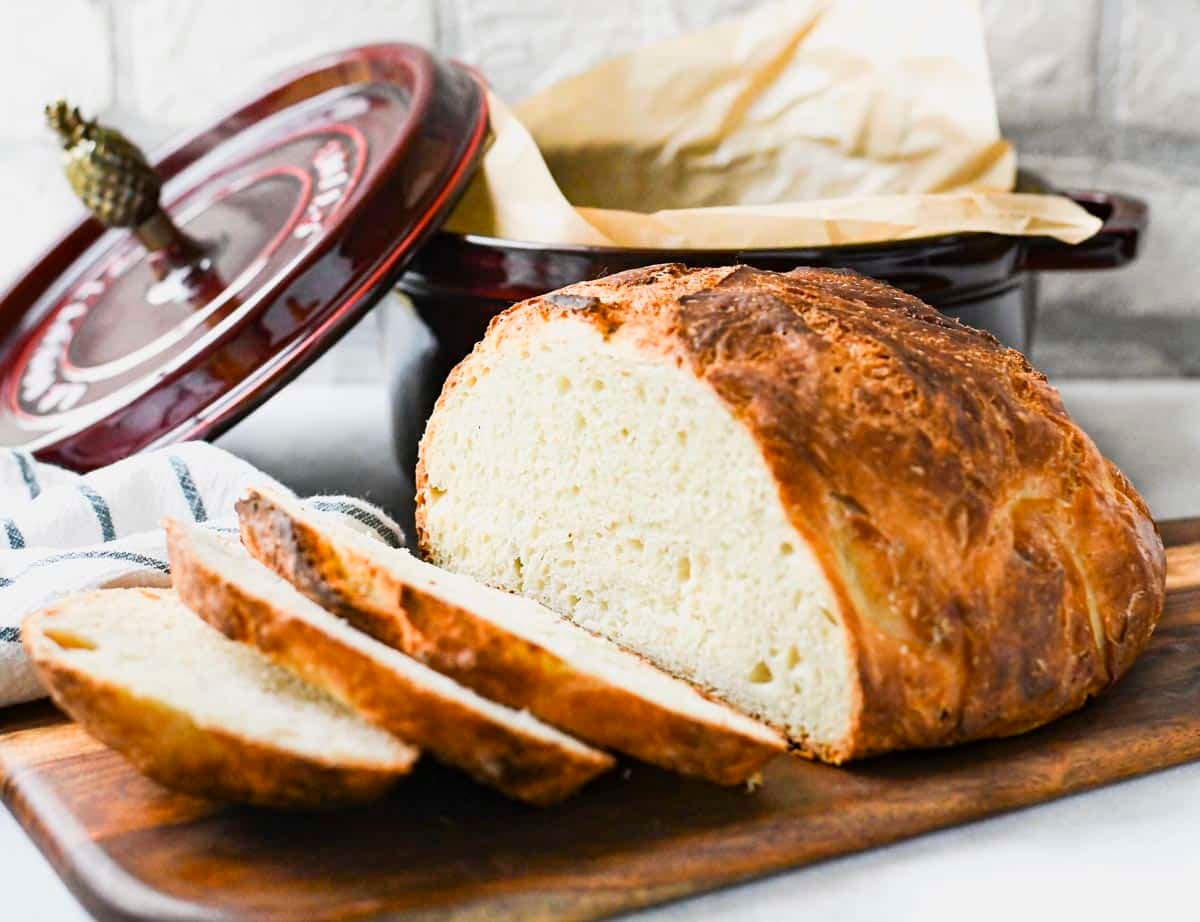
At the heart of every superb loaf of easy no knead Dutch oven bread lies, unsurprisingly, the Dutch oven itself. This robust piece of cookware isn't just for stews; it's the unsung hero of home baking, mimicking the conditions of a professional steam-injected oven. Here’s why it works such magic:
- Steam Creation and Retention: When you preheat your Dutch oven to a high temperature and then add the wet dough, the intense heat immediately reacts with the moisture in the dough. This creates a burst of steam inside the sealed pot. The tight-fitting lid traps this steam, forming a humid environment around the loaf.
- Prolonged Crust Expansion: This trapped steam is crucial. It keeps the outer surface of the dough soft and pliable for longer during the initial baking phase. This prolonged softness allows the dough to expand maximally, achieving what bakers call "oven spring," resulting in a larger, airier loaf with a more open crumb.
- Perfect Crust Development: As the dough expands in the steamy environment, the starches on its surface gelatinize. This process contributes to that signature golden, glossy, and beautifully blistered crust that crackles wonderfully when you slice into it. Once the lid is removed for the final stage of baking, the direct heat finishes crisping the crust to perfection.
Essentially, your cast iron Dutch oven provides the ideal micro-climate for bread baking, transforming a simple dough into a loaf that boasts a chewy, rustic crust and a light, tender crumb – all without the need for a professional oven's capabilities.
Mastering the Basics: Essential Tips for Your Easy No-Knead Dutch Oven Bread Journey
While the beauty of easy no knead Dutch oven bread lies in its simplicity, a few key considerations will ensure your success from the very first bake. Paying attention to these foundational elements will elevate your homemade bread from good to truly exceptional.
Water Temperature is Key
The yeast in your dough is a living organism, and its activity is highly sensitive to temperature. Always use warm water – not hot, not cold. The ideal range is around 105°F to 110°F, which should feel like comfortable bath water to the touch. Water that's too hot (above 120°F) can kill the yeast, preventing your dough from rising. Conversely, water that's too cold will inhibit yeast activity, leading to a sluggish or non-existent rise. A simple kitchen thermometer is your best friend here, taking the guesswork out of this crucial step.
Embrace the Stickiness
Unlike traditional kneaded bread, no-knead varieties rely on a very wet dough. This high hydration is what allows the proteins in the flour to develop gluten on their own, over time, without manual kneading. When you mix your dough, expect it to be quite sticky and shaggy – it won't resemble a smooth, elastic ball. Resist the temptation to add excessive flour, as this will lead to a dense, dry loaf. A truly wet dough is the secret to that coveted airy, open crumb. If you find it too difficult to handle during shaping, a light dusting of flour on your hands or parchment paper is preferable to incorporating more into the main dough.
Choosing Your Dutch Oven Wisely
The size of your Dutch oven directly impacts the shape of your final loaf. A 4 to 6-quart cast iron Dutch oven is generally ideal. A smaller, 4-quart pot will yield a taller, more rounded loaf, perfect for slicing thick rounds. A larger 6-quart pot will produce a wider, slightly flatter loaf. Both will taste fantastic, so choose based on your aesthetic preference or what you already have available. Ensure your Dutch oven has a tight-fitting lid to properly trap steam, and verify that both the pot and its lid are oven-safe for high temperatures.
Quality Ingredients Matter
While the recipe uses only a few ingredients, their quality can make a difference. Use a good quality all-purpose flour, or for an even chewier texture, bread flour. Ensure your instant or active dry yeast is fresh and active – if it doesn't foam when mixed with warm water and sugar, it's likely expired. Finally, a good quality salt (like sea salt or kosher salt) enhances the flavor without the harshness of highly refined table salt.
Step-by-Step Guide to Your Perfect Easy No-Knead Dutch Oven Bread
The process of making easy no knead Dutch oven bread is wonderfully straightforward, broken down into a few distinct stages. Follow these steps for consistently perfect results:
Mixing the Dough: Simplicity in Action
- Activate the Yeast: In a large measuring cup or medium bowl, combine your warm water, yeast, and a pinch of sugar. Stir gently and let it sit for 5 to 10 minutes. You're looking for a foamy, bubbly surface and a distinct yeasty aroma – a clear sign your yeast is alive and ready to work.
- Combine Dry Ingredients: While the yeast is activating, whisk together your flour and salt in a large mixing bowl. Creating a well in the center of the flour makes it easier to incorporate liquids.
- Form the Dough: Pour the activated yeast mixture into the well of your flour mixture. Using a sturdy wooden spoon or a Danish dough whisk, stir until all the flour is moistened and a shaggy, rough dough forms. It should pull away from the sides of the bowl. If it seems excessively sticky and hard to manage, add flour one tablespoon at a time; if there are dry pockets, add water one tablespoon at a time. The goal is a wet, cohesive mass.
The First Rise: Patience is a Virtue
Transfer your mixed dough to a lightly greased bowl, cover it with a kitchen towel or plastic wrap, and let it rise in a warm spot (ideally around 70°F to 75°F) until it has visibly doubled in size. This usually takes about 1 ½ to 2 hours. This initial bulk fermentation allows the yeast to work its magic, developing flavor and the gluten structure. If your kitchen is cool, consider placing the bowl in an oven with just the light on (creating a gentle warmth) or in a draft-free corner.
Shaping and the Second Rest: Building Structure
Once the dough has doubled, gently nudge it out of the bowl onto a piece of generously floured parchment paper. Avoid deflating it too much. Gently shape it into a round loaf by pulling the edges from underneath and tucking them towards the center, creating surface tension. This minimal handling helps develop a nice, taut skin. Cover the shaped dough loosely with the bowl or a towel and let it rest for another 15-30 minutes. This short rest allows the gluten to relax, making for a more even expansion in the oven.
Baking to Golden Perfection: The Dutch Oven Magic Unfolds
- Preheat with Purpose: About 30 minutes before you're ready to bake, place your empty Dutch oven with its lid into your cold oven. Preheat the oven to a high temperature (e.g., 450°F or 230°C). Preheating the pot ensures even, intense heat that creates that essential steam.
- Careful Transfer: Once the oven and Dutch oven are fully preheated, carefully remove the searing hot pot from the oven. Using the parchment paper as a sling, gently lower the dough (still on its parchment) into the hot Dutch oven. Replace the lid immediately.
- Lid On: Bake with the lid on for about 30 minutes. This is the steam phase, crucial for oven spring and crust development.
- Lid Off: Remove the lid and continue baking for another 15-20 minutes, or until the crust is a deep golden brown and the internal temperature reaches 200-210°F (93-99°C) with an instant-read thermometer.
- Cool Completely: Carefully remove the loaf from the Dutch oven and transfer it to a wire rack to cool completely before slicing. This step is vital; cutting into hot bread allows steam to escape, resulting in a gummy texture. Cooling allows the internal structure to set and residual moisture to redistribute, yielding that perfect crumb.
Beyond the Basic Loaf: Customizing Your Easy No-Knead Dutch Oven Bread
The beauty of this easy no knead Dutch oven bread recipe is its versatility. Once you've mastered the basic loaf, you can begin to experiment and personalize your creations:
- Flavor Infusions: Before the first rise, mix in herbs like rosemary or thyme, minced garlic, a handful of shredded cheese, sun-dried tomatoes, or olives. For a slightly sweet touch, try adding dried cranberries and walnuts.
- Seed Toppings: After the second rise, lightly mist the dough with water and sprinkle with sesame seeds, poppy seeds, or a mix of "everything bagel" seasoning for an added layer of flavor and texture.
- Flour Variations: While all-purpose flour is excellent, try substituting up to 1 cup of it with whole wheat flour for a nuttier, heartier loaf, or a small amount of rye flour for a more complex flavor profile.
This bread serves as an incredible canvas for your culinary imagination, making each loaf a unique expression of your taste.
Mastering the art of easy no knead Dutch oven bread is more than just learning a recipe; it's discovering a simple joy that transforms your kitchen into a comforting, aromatic haven. The satisfaction of pulling a perfectly baked, golden-crusted loaf from your oven, knowing you created it with minimal fuss, is truly unparalleled. Whether you're craving a rustic companion for your favorite soup, a sturdy base for a gourmet sandwich, or simply a warm slice with butter, this method delivers every time. Ready to dive deeper into the world of effortless baking? Explore our guides on Effortless Dutch Oven Bread: 5 Ingredients, Same-Day Crusty Loaf and learn how to achieve a Perfect Crust, Tender Crumb: Easy No-Knead Dutch Oven Bread Recipe. Embrace the magic, and let the aroma of homemade bread fill your home today!
