Perfect Crust, Tender Crumb: Your Guide to Easy No-Knead Dutch Oven Bread
Imagine the irresistible aroma of freshly baked bread filling your home, its crust perfectly golden and crackly, yielding to a soft, airy interior. What if we told you achieving this bakery-quality masterpiece doesn't require hours of kneading, special equipment, or even an overnight wait? Welcome to the wonderful world of
easy no-knead Dutch oven bread, a culinary revelation that transforms minimal effort into maximum deliciousness. This game-changing recipe, popularized by its sheer simplicity and astounding results, allows you to enjoy artisan-style bread the very same day you mix it. With just a handful of ingredients and about 10 minutes of active prep, you're on your way to bread-making bliss.
This isn't just a recipe; it's an experience. The magic lies in a brilliant combination of simple ingredients, a clever technique that lets time do the work, and the unique environment created by a Dutch oven. Forget the fear of baking; this method empowers even novice bakers to produce loaves that rival those from the finest bakeries, boasting a rustic charm and incredible flavor that will impress family and friends alike.
Why the Dutch Oven is Your Secret Weapon for Perfect Bread
The humble Dutch oven is not just a pot; it's the unsung hero behind the phenomenal success of
easy no-knead Dutch oven bread. This heavy, lidded cast iron pot acts as a miniature, high-humidity oven, replicating the ideal conditions of a professional baker's steam-injected oven right in your kitchen. But how does it work its magic?
When you preheat your Dutch oven to a scorching temperature and then carefully transfer your wet dough inside, the intense initial heat causes the moisture within the dough to rapidly turn into steam. Because the lid is tightly sealed, this steam is trapped around the loaf. This high-steam environment is crucial for several reasons:
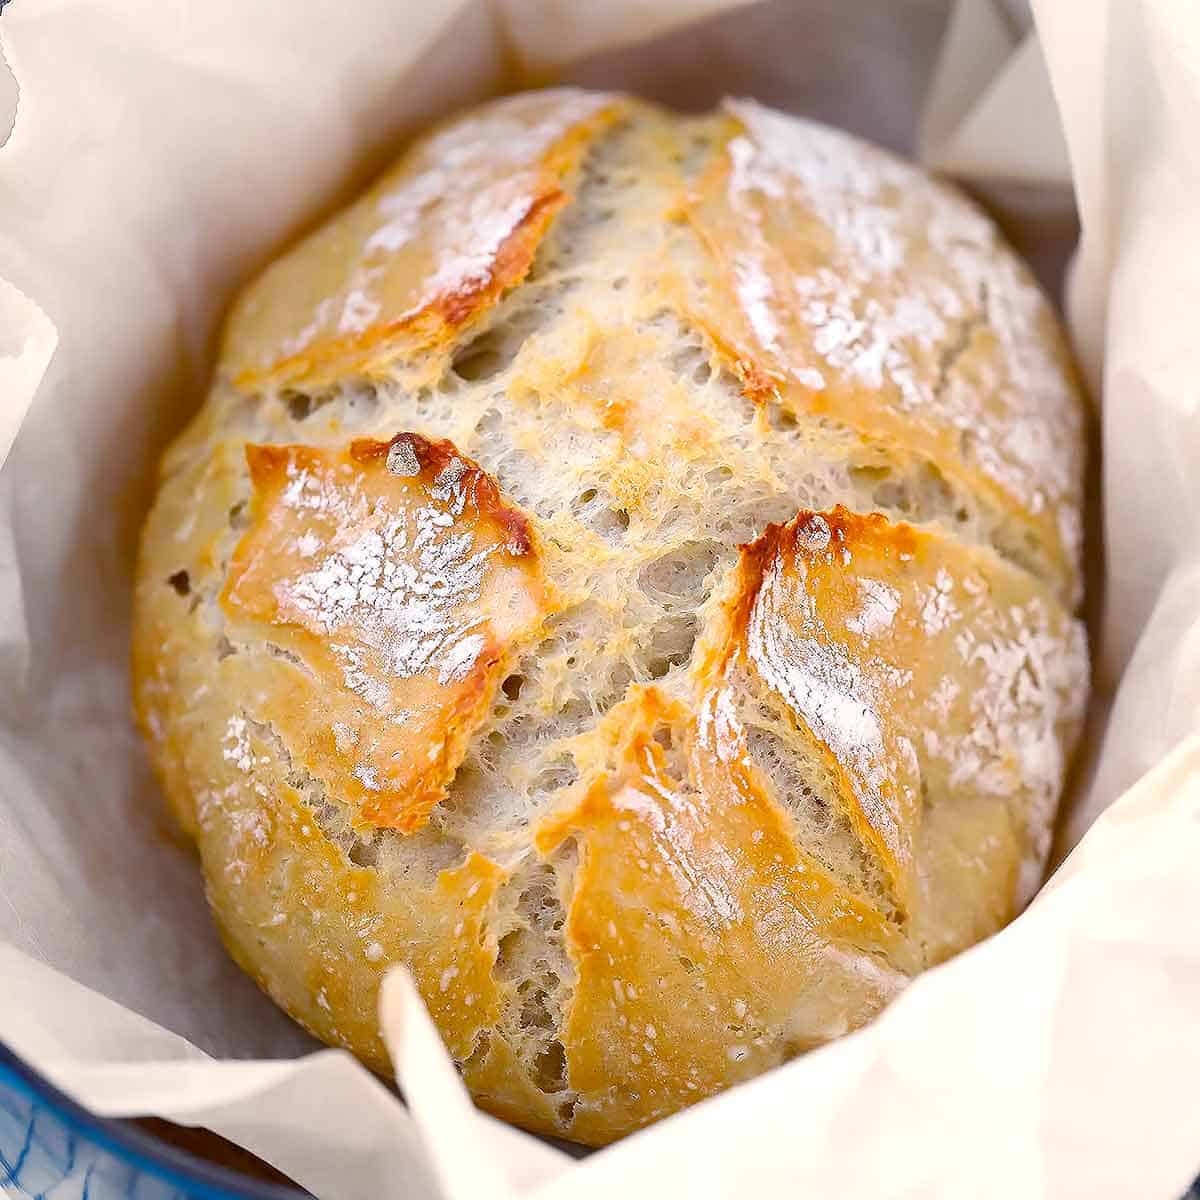
* **Softening the Crust:** The steam keeps the outer surface of the dough moist and pliable for longer during the initial baking phase. This allows the loaf to expand maximally, developing what bakers call "oven spring," before the crust begins to set. Without this, the crust would harden too quickly, restricting the bread's rise and resulting in a denser loaf.
* **Gelatinization and Gloss:** The steam also interacts with the starches on the dough's surface, causing them to gelatinize. This process is what contributes to that beautiful, golden-brown, glossy crust you see on artisan breads, often adorned with appealing blisters and a satisfying crackle.
* **Even Heat Distribution:** Cast iron is an excellent conductor and retainer of heat. Preheating the Dutch oven ensures that the dough bakes evenly from all sides, creating a consistent texture and perfectly cooked interior.
In essence, your Dutch oven creates a perfectly controlled environment, delivering professional-grade results without needing an actual professional oven. For more insights into this incredible baking tool, check out
Unlock Bakery-Quality Bread: The Magic of No-Knead Dutch Oven Baking.
Mastering the No-Knead Method: The Science of Simplicity
The very phrase "no-knead" sounds almost too good to be true, especially for those familiar with traditional bread-making's strenuous demands. Yet, this method is rooted in clever culinary science that harnesses the power of time and hydration. Instead of mechanical kneading, which develops gluten strands by stretching and folding the dough, the no-knead technique relies on a concept called *autolysis* and extended fermentation.
Gluten, the protein network that gives bread its structure and chewiness, forms naturally when flour and water are combined. With sufficient time, especially in a wet dough, these proteins slowly align and link together on their own. The yeast, beyond simply making the dough rise, also produces enzymes during the fermentation process that contribute to gluten development and, crucially, to the bread's complex flavor profile. A longer, slower fermentation allows for deeper flavor to develop, resulting in a bread that tastes incredibly rich and satisfying.
The key to success with
easy no-knead Dutch oven bread is to embrace a very wet and sticky dough. This high hydration is what allows the gluten to form without manual intervention. Many first-time no-knead bakers are tempted to add more flour to make the dough less sticky, but resisting this urge is paramount. A wet dough is a happy dough in this context, ensuring a light, airy crumb with those coveted irregular air pockets. This simplicity is truly what makes this method so revolutionary for home bakers seeking an artisan loaf without the fuss.
Essential Tips Before You Begin Your No-Knead Journey
While the no-knead process is forgiving, a few foundational principles will ensure your first loaf (and every loaf thereafter) is nothing short of spectacular. Paying attention to these small details can elevate your
easy no-knead Dutch oven bread from good to absolutely outstanding.
The Goldilocks Principle of Water Temperature
Yeast is a living organism, and like all living things, it thrives under specific conditions. For yeast activation, the water temperature is critical. Aim for water that feels like a warm bath – ideally between 105°F and 110°F (40°C-43°C).
* **Too Hot:** Water above 120°F (49°C) can kill the yeast, preventing your dough from rising altogether.
* **Too Cold:** Water below 100°F (38°C) will cause the yeast to activate too slowly, if at all, leading to a sluggish rise and potentially a dense loaf.
A simple kitchen thermometer is a small investment that makes a big difference here.
Embrace the Stickiness: The Dough Consistency
As discussed, a very wet, sticky dough is the cornerstone of the no-knead method. This ensures proper gluten development without kneading. When mixing, don't be alarmed if the dough is messy and pulls away from the bowl in a shaggy mass. This is exactly what you want! Adding extra flour beyond the recipe's specifications will increase the dough's hydration, leading to a denser, tougher loaf. Trust the process – the stickiness is a sign that the dough is on its way to forming a beautifully open and tender crumb.
Choosing the Right Dutch Oven Size
The size of your Dutch oven impacts the final shape of your loaf, though not its incredible taste. A 4 to 6-quart Dutch oven is ideal for most recipes.
* **4-Quart Dutch Oven:** Tends to yield a taller, rounder loaf. This can be aesthetically pleasing and provides more distinct crust-to-crumb ratios per slice.
* **6-Quart Dutch Oven:** Will produce a wider, flatter loaf. This can be great for slicing for sandwiches or serving with dips, offering a larger surface area.
Both sizes will deliver a delicious loaf, so choose based on your desired presentation and typical serving needs.
Quality Ingredients Matter
While this recipe uses minimal ingredients, their quality makes a difference. Use fresh, active dry yeast (check the expiration date!), good quality all-purpose or bread flour, and a decent sea salt. These elements combine to build the flavor profile of your bread.
Patience is a Virtue
The hands-on time for
easy no-knead Dutch oven bread is incredibly short, but the waiting time (for the dough to rise) is essential. Resist the urge to rush the process. Allowing the dough to complete its full rise cycles ensures proper gluten development, optimal airiness, and a richer flavor. This recipe offers a fantastic same-day option, but know that some no-knead recipes allow for an even longer, overnight fermentation in the fridge, which develops even more complex flavors.
Step-by-Step Guide to Your Easy No-Knead Dutch Oven Bread
Let's get down to the nitty-gritty of making this remarkable bread. This recipe comes together in simple stages: mix, rise, shape, rise again, and bake. Follow these steps for perfect results every single time.
Step 1: Mix the Dough
Begin by combining your warm water, yeast, and a pinch of sugar (which acts as food for the yeast) in a large measuring cup or medium bowl. Let this mixture sit for 5 to 10 minutes. You'll know it's ready when the surface is foamy and smells distinctly yeasty, indicating the yeast is active.
While your yeast is proofing, whisk together your flour and salt in a large mixing bowl. Create a shallow well in the center of the flour mixture. Pour the activated yeast mixture into the well. Using a wooden spoon or sturdy spatula, stir until a shaggy, rough dough forms. It should pull away from the sides of the bowl, leaving minimal residue. If the dough seems overly dry with pockets of flour, add water one tablespoon at a time until it just comes together. Conversely, if it's excessively wet and not forming a cohesive mass, add flour one tablespoon at a time. The goal is a sticky but manageable dough.
Step 2: The First Rise (Bulk Fermentation)
Lightly grease a clean bowl with a little oil, then transfer your shaggy dough into it. Cover the bowl with a clean kitchen towel or plastic wrap. Find a warm spot in your kitchen for the dough to rise until it has doubled in size – this typically takes about 1 ½ to 2 hours. An ideal spot is around 70°F to 75°F (21°C-24°C). If your kitchen is cooler, you can create a warm environment by placing the bowl in an oven with just the light on (do not preheat!), or in a slightly warmed (but turned off) microwave. A sluggish rise usually means your spot isn't warm enough. For more on achieving a perfect rise, consider resources like
Effortless Dutch Oven Bread: 5 Ingredients, Same-Day Crusty Loaf.
Step 3: Shaping and Second Rise (Proofing)
Once your dough has doubled, gently nudge it out onto a generously floured piece of parchment paper. The parchment paper will be your sling for transferring the dough to the hot Dutch oven. Avoid over-handling the dough, as you want to preserve as many of those precious air bubbles as possible.
Gently fold the edges of the dough towards the center, then flip it over so the seam side is down. Lightly cup your hands around the dough and gently pull it towards you, rotating slightly, to create surface tension and form a neat round loaf. Don't worry about perfection; rustic is part of the charm! Lightly dust the top with flour. Cover the dough loosely with plastic wrap or a kitchen towel and let it rest for a second, shorter rise, about 20-30 minutes, while you preheat your oven.
Step 4: The Bake
This is where the Dutch oven truly shines. Place your empty Dutch oven with its lid into your cold oven, then preheat the oven to 450°F (230°C). Allow the Dutch oven to preheat for at least 30 minutes once the oven reaches temperature. This ensures the cast iron is thoroughly hot, which is vital for that initial steam burst.
Carefully remove the blazing hot Dutch oven from the oven. Using the parchment paper as a sling, gently lower the dough into the hot pot. Be quick but careful! Immediately cover the Dutch oven with its lid and return it to the oven. Bake with the lid on for 30 minutes. This creates the steam environment necessary for a spectacular rise and tender crumb.
After 30 minutes, remove the lid. The bread should be lightly set and somewhat pale. Return the uncovered Dutch oven to the oven and continue baking for another 15-20 minutes, or until the crust is a deep golden brown and sounds hollow when tapped on the bottom. An internal temperature of 200-210°F (93-99°C) indicates it's fully baked.
Once baked, carefully lift the bread out of the Dutch oven using the parchment paper and transfer it to a wire rack to cool completely. This cooling step is crucial; slicing into hot bread can result in a gummy texture. Patience will be rewarded with the best texture and flavor.
Serving Suggestions and Variations
This
easy no-knead Dutch oven bread is spectacular on its own, served warm with a slather of good butter. Its robust crust and tender crumb also make it the perfect companion for:
* Dipping into olive oil and balsamic vinegar.
* Building hearty sandwiches with your favorite fillings.
* Accompanying soups, stews, or chilis.
* Making exceptional bruschetta or garlic bread.
Don't hesitate to experiment with variations! Add dried herbs like rosemary or thyme to the dough for an aromatic twist. Incorporate grated Parmesan or sharp cheddar for a cheesy loaf, or even a handful of olives for a Mediterranean touch. The simplicity of the base recipe makes it a fantastic canvas for your culinary creativity.
Conclusion
Baking your own artisan-quality bread has never been more accessible or rewarding. The
easy no-knead Dutch oven bread recipe demystifies what many consider a complex culinary art, proving that incredible flavor and texture can be achieved with minimal effort. From the satisfying crunch of its golden crust to the soft, airy pockets of its tender crumb, each bite is a testament to the magic that happens when simple ingredients, a clever technique, and a trusty Dutch oven come together. So, roll up your sleeves (just a little!), embrace the waiting game, and prepare to fill your home with the intoxicating aroma and unparalleled taste of homemade bread. Your journey to becoming a confident, celebrated home baker starts here.